Tuesday, December 4, 2012

Mashed sweet potatoes


Seriously, why eat boring old white potatoes when sweet potatoes are like dessert?

This is a super simple, super delicious recipe that had people raving when I took it for a party recently, so I'm sharing it with the world.
  • 2 pounds sweet potatoes, peeled and cubed
  • 1 tablespoon coconut butter
  • 1 tablespoon coconut oil
  • 1 1/2 teaspoons sea salt
  • Dash of cinnamon
If you have a pressure cooker, this will make your life much easier.  Place the sweet potatoes in your cooker and cook at 15 pounds of pressure for about 5 minutes.  Cool immediately by running cold water over the pressure cooker.

If you don't have a pressure cooker, you can always steam them or roast them in the oven.

Once your potatoes are soft, mash them and add in all of the ingredients and stir until combined.

The coconut adds such a great flavor but doesn't leave anything overly sweet.

Frittata for a crowd


Why doesn't my computer recognize frittata as a word?  Or New Zealand?  Seriously, I get the red squiggly correction lines under those words (oh, but SQUIGGLY is a word?!)

Anyway, check it.  This is a great recipe if you are going to a brunch, or hosting a brunch with girlfriends and watching Love Actually, which is ACTUALLY what happened on Sunday, haha.  And what's nice about this is you can use any veggies you have on hand.

First step, preheat your oven to 350.

Second step, grease a 9x13 baking dish with your fat of choice.  Coconut oil makes a good fat of choice here.

Third, get your stuff together.


  • 1 dozen eggs, whisked
  • 1 bell pepper, sliced. You pick the color
  • 1 large yellow onion, peeled and sliced thin
  • 1 package portabella mushroom caps, sliced (there's another one that spell check doesn't recognize!)
  • 1/3 lb Provolone cheese, diced
  • Coconut oil (or whatever oil you like to saute with)
  • Your choice of spices-I used salt, pepper, garlic powder, onion powder and paprika, a few dashes/sprinkles of each and tossed them in while I was whisking the eggs
In a large skillet, melt a couple of tablespoons of coconut oil and toss your onions in and cook over medium low heat for about 15-20 minutes or until the onions are soft and starting to caramelize.  Once those are finished take them out and put them in a bowl and set aside.  Add more fat to your pan if necessary and toss in your sliced mushrooms and bell pepper and saute until the mushrooms are tender.  Remove from pan and toss those in your onion bowl.

Add your whisked eggs to the baking dish and toss in your veggies and cheese and stir to combine everything.  Pop in the oven for 20-30 minutes or until egg is firm.  Slice and serve!

What's also nice about this is if you have leftovers, it makes for a quick and easy emergency protein snack!


Wednesday, September 19, 2012

Meatballs


So a few days ago I took out one of the grass fed chuck roasts that were a part of my bulk beef order with the intention of making a roast.  Well, I'm going to Chicago for the weekend tomorrow and this thing took about 3 days to thaw, so, no roast for me.

Instead, I made meatballs!  And man, there really IS a difference between grain and grass fed beef.  These meatballs were so full of flavor, and not dry at all.  I had to stop after 3, I could have gorged on those things.


  • 2# grass fed chuck roast, cut into chunks (if you don't have grass fed, use what you've got)
  • 1.5 tsp salt
  • 1/2 tsp ground black pepper
  • 1/2 tsp paprika
  • 1/2 tsp ground sage
  • 1/2 tsp onion powder
  • 1/2 tsp garlic powder
  • Dash of cayenne pepper (optional)
  • 1T olive oil
  • 1 egg
Preheat oven to 400.

Take your chunks of roast and toss them a handful at a time into the food processor and pulse until it's ground like hamburger meat.

In a large bowl, combine everything and mix together.  Form the balls (I used a large cookie scoop and ended up with 20 meatballs) and put on a rimmed baking sheet.  Now these will be wet, but don't worry, they won't fall apart.

Bake for 20 minutes.


Thursday, August 23, 2012

One of the easiest things you'll ever make


So I'm buying 1/4 of a cow that is due in next week, so I'm trying to make room in my chest freezer in the basement to fit all of the meaty goodness coming my way.  Out came the turkey breast.

This is a little lengthy process (over 2 days), but it's very little hands on work, so it's great!

Ingredients:


  • Bone in turkey breast 
  • 3-4 tablespoons Penzey's Greek Seasoning (or whatever Greek seasoning you like, or really, whatever seasoning you like)
  • 1/2 stick butter
  • Olive oil
  • Arrowroot powder (or cornstarch)-for the gravy (optional)
  • Kosher salt
Okay, day 1, get your turkey out of the package and rinse it.  Grab yourself a large stock pot (large enough to hold the turkey breast while it's submerged in water) and fill it with cold water and kosher salt.  You want to make a brine, and a standard one is 1 cup of salt per 1 gallon of water.  I used about 2.5 cups of salt for my brine and it was just a tad on the salty side, but I like salt, so it didn't bother me.

So, get your briny water ready and dunk the turkey breast in and stick it in the fridge overnight.

Next day, take the turkey breast out of the brine and rinse it with cold water.  Put the turkey in a crock pot (it's great if you've got a large oval one) and cut some slits in the skin and stick the cubed butter under the skin all over.  Next, drizzle a little bit of olive oil over the top and rub the Greek seasoning all over.

Put the cover on the crock pot and cook on high for 1 hour then on low for 5-6 hours or until the juices run clear.

Now this last part is optional, but tasty good.  When the turkey is done in the crock pot, preheat your oven to 450.  Place the breast in a baking dish and drizzle a little more olive oil over the skin and bake for about 5 minutes, just to crisp the skin a little bit.

While the turkey is in the oven, again, optional, but tasty good, take the liquid from the crock pot and put it in a skillet and bring to a low boil.  Mix in some arrowroot powder or cornstarch to thicken and, stirring frequently, keep on a low boil until it starts to thicken, then reduce to a simmer for a few minutes.

Let the turkey stand for a few minutes, slice, serve and enjoy!


Thursday, August 9, 2012

Goat cheese "risotto"


  • 6 cups of cauliflower, riced
  • 1/2 red onion, sliced thin
  • 2 garlic cloves, minced
  • 2 tablespoons olive oil or coconut oil
  • 1-2 cups of chicken stock
  • 4 ounces goat cheese 
In a large saute pan, add the oil, garlic and onions and saute over medium heat until tender (about 5 minutes).  Add the cauliflower rice and let get a little brown (about 2-3 minutes).  Add the chicken stock (I used 1.5 cups, so start with 1 cup and add as needed) and increase the heat a bit until you get a low boil, then bring down to low.  Cover and simmer for about 10 minutes, stirring occasionally, and add the goat cheese in and stir.  Resume cooking another 10-20 minutes or until most of the liquid is absorbed.  Salt and pepper to taste.

*Note-the goat cheese is a subtle flavor here, but it was perfect for me.  If you want more of the tangy flavor, add another ounce or two!

Monday, July 30, 2012

Banana chia bread


So several months ago I made this recipe and it came out super amazing, except I added too much coconut oil and didn't let it cool before I tried to take it out of the pan, and it ended up a soggy mess.  Delicious, but messy.

My sweet tooth has been making a comeback and I wanted to give it another go, but I didn't have all of the ingredients on hand, so I made do with what I could, and the end result was still delicious, especially slathered with some coconut butter.  It was just a tad dry for my liking, so keep an eye on how long you bake it.

Banana Chia Bread
  • 2 cups almond meal
  • 3/4 cup arrowroot powder (disclaimer: I totally cheated and used cornstarch, only because 1) I only have a small amount of arrowroot powder and 2) arrowroot powder is expensive!!  If you use cornstarch, it's an even equivalent)
  • 1/4 cup golden flax meal
  • 2 tbsp chia seeds
  • 1/4 cup vanilla whey protein powder
  • 3 tsp cinnamon
  • 1 tsp salt
  • 1 tsp baking soda
  • 1 tbsp cocoa powder
  • 1/4 cup coconut oil, melted
  • 1/3 cup agave nectar
  • 2 eggs + 2 egg whites
  • 1 tbsp apple cider vinegar
  • 1 tbsp vanilla
  • 2-3 bananas, mashed (the riper the better!  I used 2 and it gave me a cup.  The bread came out just a little dry for my liking, so go ahead and add another banana if you want)
Preheat the oven to 350 and grease a loaf pan

In a large bowl, whisk together all of the dry ingredients.  In a separate bowl, mix the wet ingredients together then pour into bowl with dry ingredients and stir until combined.  

Bake for 40-45 minutes or until a toothpick comes out clean.  Let cool in the pan on a rack for at least an hour before removing.


Monday, July 9, 2012

Coconut blueberry bread (and a bonus recipe!)


So it's blueberry season here in Michigan, and yours truly bought 3 pints last week.  Why?  I don't know.  I'm not going to eat 3 pints of blueberries before they go bad....and so, I baked.

Now this isn't going to be your traditional soft, fluffy, pound-cake like bread you are used to as coconut flour is very dense and can dry things out.  However, don't overbake it and slather it with some yummy stuff like coconut butter or sunflower seed butter and you've got a tasty treat.

Preheat oven to 350 and grease a loaf pan.  Grease it good as this will try to stick!


  • 3/4 cup coconut flour
  • 1/2 cup melted coconut oil
  • 3 tablespoons chia seeds (optional)
  • 2 tablespoons raw honey
  • 1/2 teaspoon salt
  • 1 teaspoon cinnamon
  • 6 eggs, whisked
  • 1 teaspoon vanilla
  • 1 cup blueberries
In a large bowl, mix everything but the blueberries together until combined.  Now, the batter is going to be thick, you can always thin it out a little with some almond milk if you want.  Fold in the blueberries and bake for 30-40 minutes or until the edges are brown.  Remove from oven and let cool before removing from the pan.

UPDATE:  So while this was tasty, I felt like it could be better so I turned it into french toast, and it was way tasty!  Cut a couple of slices and soak in almond milk (or your milk of choice) for a while (like an hour or two at least), then dip in egg and cook in a skillet with your fat of choice (I used coconut oil).  Serve with syrup or a berry compote (I did a pint of strawberries and blueberries with a splash of almond milk and then mashed the berries a few times to get a nice sauce out of it).  You won't even miss the sugar!


Wednesday, May 23, 2012

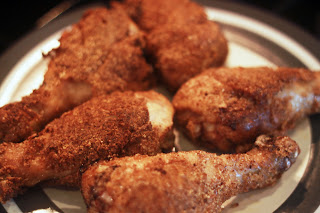
Paleo fried chicken


Okay, because I believe in giving credit where credit is due, the original recipe came from the Paleo Comfort Foods cookbook, but below is my take on it.

And I'll tell you right off the bat, this isn't your KFC variety, super crispy chicken skin, but it's also a heck of a lot better for you!  Plus, I didn't use some trans fatty garbage to do the frying, I used organic all natural, all vegetable shortening.  I bought a 4 pack several months ago from Amazon and just noticed that they expire in February 2013 so I thought I'd better get cracking and use some of this stuff up.

Unfortunately, I didn't have time to soak the chicken in a brine, but I will definitely do it next time.  It's the best way to go, and no, you don't need sugar for a brine like a lot of recipes suggest.  I usually do 1 cup of kosher salt per 1 gallon of water and soak overnight.

Now, on to yummies...


  • 2 pounds chicken (I used legs because it's what I had on hand, but you can use any combination)
  • 3 eggs
  • 1 cup shortening (or coconut oil)
  • 1 cup almond meal
  • 1 teaspoon paprika
  • 1/2 teaspoon cayenne pepper (optional, this added the perfect amount of heat for me)
  • 1 teaspoon garlic powder
  • 1 teaspoon onion powder
  • 1/2 teaspoon salt
  • 1/2 teaspoon black pepper
Preheat your oven to 400 degrees and line a baking sheet with a piece of aluminum foil (just makes for easier cleanup) and place a cooling rack on top (this will keep your chicken crispy as it bakes

Meanwhile, in a cast iron skillet, melt your cup of shortening over medium heat.

Whisk 3 eggs in a large bowl and add the chicken, making sure it's coated.

In a separate large bowl, mix together all of the dry ingredients and add the chicken.  I tossed my chicken in one at a time to ensure even coating.  It took a few extra minutes that way, but every piece had a nice crust on every side, so to me it's worth the effort.

Once the shortening/oil is melted, put the chicken in and let cook on each side for about 2 minutes.  It's important to let it rest once it's in there and not move it around too much, you don't want the coating to fall off! 

Remove the legs from the skillet and place on the baking sheet until all of it is ready for the oven.  Bake at 400 degrees for 15-30 minutes, or until the chicken is cooked thoroughly.  I had to bake the legs for about 25 minutes.

The end result is a crunchy coating and juicy chicken and a much better for you meal then you'd get in the drive thru!

Monday, April 30, 2012

Meat muffins


I've got a freezer full of grass fed ground beef, which is kind of awesome, but you kind of get into a rut with what to do with it.  Using this recipe as a base, I added on to it with what I had.  This isn't very pretty but it comes together quick, stores easily and is a super quick protein addition.


  • 2 pounds ground beef
  • 1 pound hot Italian sausage, casing removed
  • 1 egg
  • 1/2 cup tomato sauce
  • 1 tablespoon minced onion
  • 1 tablespoon garlic powder
  • 2 teaspoons chili powder
  • 1 teaspoon paprika
  • 1 teaspoon cayenne pepper
  • 1 tablespoon Italian seasoning
  • 1/4-1/2 cup almond meal (my ground beef was really wet, so I needed 1/2 cup to keep it all together, but you may use less depending on how yours is)
Preheat oven to 375 and grease 2 standard size muffin pans

In a large mixing bowl, combine all of the ingredients and mix until combined.  Drop equal amounts into the pan and bake for 15-25 minutes or until cooked thoroughly.  An easy way to take these out is just to grab them with some tongs and put them on a cooling rack over a plate so they can drain.  

Makes approximately 18 muffins.

PS-These are dog approved too!  I came back and noticed 2 were missing, but neither of my animals owned up to the theft.

Saturday, April 28, 2012

Sweet potato cookies


I was browsing on Pinterest the other night and came across something that sounded so simple and so tasty I knew I had to try it!  However, I felt that the original recipe was a little lacking, so I added to it.  Here is my recipe below.  Be forewarned though, these have no sugar, so they really aren't at all sweet (especially if you're used to sugary/sweet things) but if you are eliminating sugar from your diet like I am and have a craving for a dessert/snack, this has a great cake-like consistency and will help curb a craving.


  • 1 cup sweet potato, mashed
  • 3 tablespoons almond butter
  • 1 teaspoon cinnamon
  • 1/2 teaspoon pumpkin pie spice
  • 1 1/2 teaspoon vanilla
  • 1/2 tablespoon coconut flour
  • 1 teaspoon cocoa powder
In a bowl, combine all ingredients and drop rounded tablespoons onto a parchment lined cookie sheet, flattening them out a little.  Bake in a preheated 350 degree oven for 10 minutes.  Cool on a wire cooling rack.

Makes approximately 15 cookies

Wednesday, April 11, 2012

Sweet potato hash


So I bought a couple of sweet potatoes a while ago and I keep trying to figure out what to do with them.  I thought about making sweet potato hash from Everyday Paleo, but I didn't have sausage.  I thought about making twice baked sweet potatoes from PaleOMG but didn't feel like doing all the work, so I did a combo of both and the end result was amazing if I do say so myself!


  • 2 medium sweet potatoes, peeled and grated (use a cheese grater or the shredding disc on your food processor)
  • 5 slices bacon
  • 1 small yellow onion, sliced thin
  • 1 tsp minced garlic
  • Sea salt (to taste, I just did several grinds right in the pan)
  • Black pepper (to taste)
  • Cinnamon (I didn't measure but I'd estimate I used maybe 1-1.5 teaspoons?)
  • Dash of cumin
  • 1 tablespoon coconut oil
In a large skillet, cook the bacon.  Remove and set on a paper towel to absorb excess grease and chop roughly

Toss the sliced onion and garlic into the skillet (use the bacon grease that's in the pan) and saute until onions are tender.  Melt in the coconut oil and add the sweet potatoes, salt, pepper, cinnamon and cumin and stir until the potatoes are tender (mine took maybe 5 minutes).  Add the bacon back in and combine everything.

The cinnamon and coconut oil lend a sweetness to the potatoes, while the bacon, salt and cumin add a salty/smoky flavor.  I can see this going into the rotation of post-WOD snacks, a great balance of healthy carbs, fat and protein!  My only regret is not making a double recipe, I am going to devour this!

Sunday, April 1, 2012

Mushrooms


Good thing people are coming over tonight for book club, otherwise, I'd be eating all 12 of these myself.

  • 12 white button mushrooms (you'll want to get larger ones, as they do shrink down a bit when you bake them)
  • 4 ounces goat cheese, softened (I left mine out at room temperature for about an hour)
  • 1/4 cup shredded white cheddar (or mozzarella, whatever you have on hand)
  • 1/4 teaspoon garlic powder
  • 1/4 teaspoon onion powder
  • 1/4 teaspoon cayenne pepper (optional)
  • Parmesan cheese (optional)
Clean and remove stems from mushrooms and brush the tops with olive oil.  Place in a rimmed baking dish, top side up, and bake for about 10 minutes at 400 degrees (or until the mushrooms start to soften).  Remove from oven and flip over to let the steam out.  Let cool for a few minutes.

In a mixing bowl, stir the goat and cheddar cheeses and spices until combined.  Now you can either just roll out little balls and pop them in the mushrooms, or you can use a ziploc/pastry bag, or do what I did when your ziploc bag fell apart on you and just scoop some onto a knife and wipe it onto the mushrooms :)

Now, if you want, you can just pop these into the fridge if you aren't ready to bake them, for up to a day, or if you're ready, sprinkle the mushrooms with a little parmesan cheese and pop back into the 400 degree oven for about 10 minutes, finishing up the last couple of minutes in the broiler if you want.


Breadless bruschetta


I was browsing around on Pinterest this morning and saw a great idea for a recipe, tomatoes topped with spinach and cheese.  Yum!  Kind of like a bruschetta, but no bread, so it's paleo approved!  I made a couple of modifications, measured some things out, so here's the final product.

  • 6 medium tomatoes (or you could use 2-3 large beefsteak tomatoes)
  • 1 bag of spinach
  • Shredded cheese (I used organic white cheddar)
  • 2 ounces olive oil
  • 2 ounces balsamic vinegar
  • 1/8 teaspoon garlic powder
  • 1/8 teaspoon onion powder
  • Sea salt
  • 1-2 teaspoons minced garlic
  • 1 tablespoon lemon juice
  • Olive oil
Slice the tomatoes (you don't want them too thin, or too thick, I got about 4 slices from each tomato) and lay flat in a rectangular baking dish.  Sprinkle with sea salt.

In a small bowl, whisk together the olive oil, balsamic vinegar, garlic powder and onion powder until you've got a thicker consistency.  Pour over the tomatoes and put the lid on the dish.  Feel free to shake it around a little at this point to make sure everything is coated.  Let sit for 2-3 hours and marinate.  

While you're waiting, you can go ahead and toss the spinach into a skillet with some olive oil, minced garlic and lemon juice.  Saute until wilted and set aside.

....2-3 hours later....

Set broiler to high and line a baking sheet with foil and place the tomatoes and place some spinach on each one, and sprinkle with cheese.  Pop under the broiler for 5-7 minutes, or until the tops start to brown.

Monday, March 26, 2012

Szechuan Lo Mein


Wow, it's been a while since I posted!  But, have no fear, anyone who reads this, as there is a 90 day challenge starting at the box on April 1, so expect lots of posts!

Todays meal was inspired by a recipe I found on Pinterest, thanks to Bill & Hayley over at Primal Palate.

I made a few changes/additions/substitutions to it and was pretty pleased with the results.  My recipe is below:


  • 1 pound boneless, skinless chicken breast, sliced into thin strips
  • 1/4 cup slivered almonds
  • 1 8 ounce can of water chestnuts, sliced
  • 1/4 cup green onion, chopped
  • 1 8 ounce package baby Bella mushrooms, sliced 
  • 1 teaspoon ground ginger
  • 2 cups broccoli (it's fine to use frozen broccoli, just make sure it's mostly thawed, it will cook up quicker)
  • 3-4 cups of cabbage, sliced thinly
  • Sesame oil
  • 1 teaspoon minced garlic
  • 1 tablespoon fish sauce
  • 1-2 tablespoons tamari
  • 2 tablespoons chili garlic sauce*
  • 2-3 tablespoons gluten free szechuan sauce (use more or less depending on how hot you want it, 3 tablespoons was just about right for my liking)
Heat a wok (or large skillet if you don't have a wok) on high and add sesame oil and chicken.  Cook until it is almost cooked through.  

Add the broccoli, water chestnuts and mushrooms, cook another 3-5 minutes or until broccoli starts to get tender.

Add almonds, garlic, green onions, ginger and cabbage along with the fish sauce, tamari, chili garlic and szechuan sauce.  Stir everything together and cover, stirring occasionally, for 10-15 minutes, or until cabbage is soft.

Garnish with sesame seeds

Makes about 4 servings

*So I used a sweet chili garlic sauce at Trader Joes and one of the ingredients listed is sugar, so while this isn't a *true* paleo meal, I think it's close enough.  Besides, I couldn't find a non-sugar containing sauce and was too lazy to make my own.

Lamb Meatballs, part 2


So a while back I made some lamb meatballs that came out pretty tasty.  Well, we have another winner!  I'd like to thank my local grocery store for having a sale on ground lamb for $2.99/lb that allows me to experiment.


  • 1 1/3 pound ground lamb
  • 1 egg
  • 1/3 cup almond meal
  • 1.5 tablespoons Penzy's Greek Seasoning
  • Handful of parmesan cheese
In a bowl combine all ingredients and with your hands, mix everything together.  Roll out equal size meatballs (I used a cookie scoop) and place on a baking sheet and bake in a preheated 350 degree oven for 20 minutes.

Super yum, and these are a great emergency protein snack!  (I ate 4 right after I took them out of the oven...)

Makes 20-22 meatballs, depending on size

Friday, February 10, 2012

Ch-ch-ch-Pudding!


Remember Chia Pets?


So do I.

But did you know that Chia seeds are actually the newest superfood?  (Well, newest in the sense that I just heard about it the other day from my CrossFit coach, Hillary).  High in Omega 3's, ALA, a shit ton of fiber (that might make you shit a ton if you aren't careful), naturally hydrating, and useful in just about anything.

So I went to Costco the other day and picked myself up a bag (got a big bag that will no doubt last me until the end of time for under $7).  I sprinkled some in my stir fry the other day for a little crunch, and I just made some chia pudding.  My apologies, I can't find the link that I found the original recipe that gave me the idea, but here is mine:


  • 3/4 cup coconut milk
  • 4 tablespoons chia seeds
  • 1/2 to 1 tablespoon honey (I used about 1.5 tablespoons and it was too sweet for me)
  • 1 teaspoon dark chocolate cocoa powder
  • 1/2 teaspoon cinnamon
In a bowl, combine all ingredients and whisk until blended.  Put in the fridge for 20-30 minutes or until it is set.

**Makes 2 small servings, or 1 slightly-more-then-you-should-eat serving

The texture is similar to a tapioca or rice pudding, and the seeds will get tender while they soak so it doesn't have more crunch, but it's pudding, you don't want crunch!

Just be careful with your consumption though, I have it on good authority that too much chia will make you have poop monsters (and who knows, you might grow a chia pet in your belly!)

Wednesday, February 8, 2012

Sausage hash


I love when something like 2 ingredients turns into deliciousness.

My apologies for not having proper measurements for spices, but play around with what you have, what you like!  That's part of the fun in cooking!

Ingredients:

  • 1 pound bulk breakfast sausage
  • 3-4 turnips, shredded and excess moisture removed (I grated mine in the food processor last night, then wrapped them in a couple of paper towels and threw in a bowl in the fridge overnight)
  • Your choice of seasoning (I used a few grinds of the sea salt shaker, a few shakes of pepper, a couple shakes of onion powder and a little sprinkle of cayenne pepper)
In a large skillet, crumble and cook the sausage until done.  Remove and set aside, reserving some of the fat (or if you were like me and made the sausage last night, melt a tablespoon or two of butter).

Add the grated turnips and sprinkle with seasonings.  Spread out an even layer and let cook for 5 minutes until they are slightly brown on the bottom, flip and cook for another 5 minutes or so, until the turnips have shrunk down and are tender.  (The difference between using turnips for hash browns over potatoes is that turnips won't get super brown and crispy like potatoes will).

Add the sausage back in and mix until everything is combined.

This came out great!  Will be a perfect breakfast on the go, or post workout snack, or really anytime meal.  Not sure about turnips?  Ignore the name, this is a great root vegetable, only has about 1/3 of the calories of potatoes, are an excellent source of Vitamin C, fiber, folic acid, B6 and a slew of other good stuff.  If you're curious about the taste, the first time I had them they tasted kind of like radishes, slightly spicy, but when you've cooked them down they are great.

Tuesday, February 7, 2012

Coconut flax perch


First, I have to thank Hillary over at CrossFit Bloomfield for giving me the idea for the coating with this recipe, she had some chicken a couple of weeks ago she had baked and it inspired me.


  • 3/4 pound of fresh caught lake perch (or your fish of choice)
  • Coconut milk
  • 1/2 cup golden flax meal
  • 1/2 cup unsweetened, shredded coconut flakes
  • 1/2 cup almond meal
  • 1/2 teaspoon black pepper
  • 1/2 teaspoon kosher salt
  • Shortening or your fat of choice
Soak your fish in coconut milk for several hours or overnight if possible.

When you're ready to cook, take the flax, coconut, almond meal, salt and pepper and combine.  I put mine in the food processor and pulsed a few times, just to blend everything together.  Take half the mixture and place on a plate for dredging, and reserve the other half to add more as needed, that way, if you end up with some extra mixture like I did, you can save it for breading another time.

Meanwhile, in a cast iron skillet, melt your shortening over medium heat.  I was excited because I finally had a reason to use this!  Preheat your oven to 350 as well.

One at a time, remove the perch from the coconut milk and dredge through the coconut/flax/almond mixture, making sure both sides are coated evenly.  Place in skillet and cook for about 3-5 minutes on each side, then transfer to a baking sheet and bake at 350 for 10-15 minutes or until the fish flakes easily.


Bone broth


Have a couple of days to let things simmer on the stove and then sit in the fridge?  Why not make some bone broth?

Bone broth, while it may seem complicated by the length of time it can take, is actually just as simple as making any other broth, and the health benefits far surpass the inconvenience it may cause.

Here is a rundown, compliments of Marks Daily Apple:


  • Bone marrow – We went over this last week, but I’ll say it again: bone marrow is one of the first “superfoods” (for lack of a better term – I actually slightly cringe using it) our ancestors enjoyed. It’s fatty, with a bit of protein and loads of minerals. Even if you’re cooking spindly chicken bones, there’s going to be marrow, and that marrow will make it into your stock.


  • Collagen and gelatin – Most commercial gelatin comes from animal collagen already, so why not cut out the middle man and get your gelatin directly from bone and cartilage? The more collagen your bones have, the more gelatinous, rich, and viscous your stock will be – important qualities, especially if you intend to reduce your stock into sauces. Gelatin may even reduce joint pain in athletes, as one (admittedly small) study appeared to show. Another showed benefits for ulcer patients.


  • Glycine – Although our bodies already produce plenty of glycine, rendering it a non-essential amino acid, there’s some evidence that supplementation can help mitigate free-radical oxidative damage in rats with alcohol-induced hepatotoxicity. Bone broth is rich in glycine. It probably doesn’t mean much, but it can’t hurt. And hey – it may even improve sleep quality, as one Japanese study showed in human subjects. Drink a warm cup of broth before bed, perhaps?


  • Proline – Proline is another non-essential amino acid found in bone stock, but supplementation has shown promise in patients suffering from vision loss due to gyrate atrophy. It’s also an important precursor for the formation of collagen, though it’s not clear whether eating proline has any affect on the body’s ability to make collagen.


  • Hyaluronic acid – Hyaluronic acid, also known as hyaluronan, is one of cartilage’s three glycosaminoglycans. It helps broth gel, and it’s been used for years to treat race horses with osteoarthritis, usually as an intra-articular injection or IV fluid. Recent studies on oral administration have been promising, though, meaning oral administration of quality bone stock (as opposed to, um, what other method of administration?) might help us with our joint issues, too. According to Wikipedia, human studies are underway and showing promise, but I wasn’t able to dig up much beyond this small study. Still, it’s compelling, and I’ll continue to drink broth regardless.


  • Chondroitin sulfate – Chondroitin sulfate is another glycosaminoglycan present in bone stock. It’s also a popular supplement for the treatment of osteoarthritis the efficacy of which has come under question. One recent review concludes that chondroitin sulfate “may interfere with progression of osteoarthritis”. I’d say it’s worth a shot.


  • Calcium – I’ve downplayed the importance of large amounts of supplementary calcium in the past, but that doesn’t mean it’s not important. It’s the raw material for bone production and fortification, and bone stock might be one of the best sources of calcium around, especially for those who avoid dairy and don’t eat enough leafy greens.


  • Phosphorus – There’s also a good amount of phosphorus in bone stock, though I doubt Primal eaters lack adequate dietary phosphorus (there’s plenty in meat). Still, it’s a nice buffer.


  • Magnesium – Magnesium is pretty lacking in the modern diet. Fatty fish like mackerel offer good amounts, as do leafy greensnuts, and seeds, but most people, Primal folks included, could stand to take in more magnesium. Dr. Michael Eades says if he had to recommend just one supplement, it’d be magnesium; Dr. Stephan Guyenet over at Whole Health Source recently posted a couple great pieces, one on magnesium and insulin sensitivity (short version: the former improves the latter) and another on magnesium and vitamin D metabolism (short version: the former affects the latter). Bone stock is just another way to obtain this valuable mineral.


  • Sulfur, potassium, and sodium – Stock has these minerals in mostly trace amounts, but they’re all important for health. Sodium isn’t really an issue for most people, but potassium is undoubtedly important and often lacking. Both are crucial electrolytes (bone broth – possible new sports drink?). Sulfur is the “S” in MSM, or methylsulfonylmethane, the popular joint supplement that has shown some promising results in humans.


  • Read more: http://www.marksdailyapple.com/cooking-with-bones/#ixzz1lhOkvAkA


    So last week I was browsing on Nom Nom Paleo and found this recipe for oxtail broth and thought I'd give it a go.  Unfortunately, oxtails were about $8/pound, and mama is on a budget, so I swapped out the bones for pork neck and beef knuckle bones.  Then, yours truly flubbed up the shopping list and forgot a couple of things, bought some extras that I didn't need.  My brain was obviously not working yesterday.  But the nice thing about a broth is that you can really put in anything you like!  I give you my recipe below:

    Equipment you'll need:

    • Crockpot (or a large enough stock pot and enough patience if you plan on letting it simmer on the stove for 10+ hours)
    • Strainer (a fine mesh strainer is an excellent tool for this, I used my regular strainer initially but after I scraped the fat off the top, I was left with some very fine drippings, so I sent that through the mesh strainer, and if you've got another pair of hands in the house to help, I'd recommend the mesh strainer first and save yourself a step)
    • A soup pot aside from the one you use to cook the broth in
    Ingredients you'll need (or ingredients that I used):
    • 2 pounds pork neck bones
    • 2 pounds beef knuckle bones
    • 2 leeks, sliced lengthwise and cut into thirds and rinsed
    • 2 celery stalks, chopped
    • 2 carrots, chopped (or a couple of handfuls of baby carrots, which is what I used)
    • 1 large onion, chopped into big slices
    • 7 cloves of garlic, smashed
    • Kosher salt (I used about a palmful)
    • Black pepper 
    • 5-6 bay leaves
    In your crockpot layer the veggies on the bottom, toss in a handful of salt and pepper, toss in the bay leaves then layer the bones on top.  Fill with enough water to cover.  I have a 5 quart crock pot and the water was up to the top on this, and as it cooked, some liquid did splatter, so make sure your surrounding area is clean.

    Cover and cook on low for 10 hours or until the meat is falling off the bones.


    Remove cover and let cool for a bit, then begin to strain.  This is where it will be helpful to have someone help, if you can.  I didn't, so I just took the bones out with a slotted spoon, and took a bunch of veggies out, and then strained the broth out with the larger strainer (and this is where your mesh strainer comes in handy) into the other soup pot.  Place that in the fridge overnight, and when you take it out, there should be a solid layer of fat on the top.  Simply scoop that out and this is where the mesh strainer came in handy for me as I had to strain it again into another pot.


    Now initially, my broth didn't have the gelatinous consistency that Nom Nom's did (aka, meat jelly), but that could be something as simple as using too much water in mine.  However, it did thicken up a bit more after I re-strained everything and put back in the fridge.

    Now, to enjoy!  Simply scoop out a mug, heat and drink straight.  Or, you can add some veggies/meat to it to have a soup/meal of sorts, but I'll be enjoying this just as it is.  Maybe my body will use some of the gelatin and proteins and start to re-build some cartilage in my knees ;)

    My batch came out pretty tasty, but it could have used more salt, so feel free to be a bit more liberal with your seasoning.


    Monday, February 6, 2012

    Lamb Meatballs


    First, I have to give credit where credit is due.  Primal Blueprint Quick & Easy Meals is probably my go-to cookbook when I'm feeling uninspired or am lacking on ideas for food prep.  It truly is quick and easy, and every single recipe I've made has been a winner.

    When I was at the store last week I picked up some ground lamb on sale (yes, cheap meat!) and set out to make the lamb meatballs that can be found on page 179 of the cookbook.  I was lacking an item or two (pine nuts and something else) so I decided to improvise a bit and make a few additions/substitutions.  My recipe is below.

    • 1 1/4 pound ground lam
    • 1 egg
    • 1 tablespoon dried parsley
    • 1 teaspoon minced garlic
    • 1/4 teaspoon cinnamon
    • 1/4 teaspoon allspice
    • 1/2 teaspoon cumin
    • 1/2 teaspoon paprika
    • 1/2 teaspoon kosher salt
    • 1/2 teaspoon chili powder
    • 2 tablespoons grated romano cheese (parmesan would work fine if you have that)
    Combine all of the ingredients in a bowl and mix until combined.  Using a cookie dough scoop, or whatever you have (my scoop is a little over a tablespoon, I think), form meatballs.

    In a large skillet over medium heat, melt1 tablespoon of your choice of fat/oil (I used some bacon grease, man that is one of my favorite smells ;)  Add the meatballs and cook for 2 minutes, then flip and cook for another 2 minutes.  Cover and turn heat to medium low for 10-12 minutes or until the meat is no longer pink in the middle.

    The result?  Tasty!  They were a little heavy on the cumin, even with the extra meat (the original recipe calls for 1 pound of ground lamb, but my package was a little over so I used it all), and I got 18 meatballs instead of the dozen that the original recipe called for.  These will make a great emergency protein snack.

    Wednesday, January 18, 2012

    Green beans with caramelized onions and bacon


    Super quick and super easy side dish alert!

    I'm having dinner tonight with two girlfriends, we've started monthly paleo dinners and it's really nice to have other people who eat how I do, so we can get together, eat some healthy, delicious food and catch up with each other :)  Juliana is hosting tonight so I threw together a side.


    • 1 bag frozen (or fresh if you've got them) green beans.  I bought the frozen french cut green beans, they just look a little fancier ;)
    • 1 small red onion, halved and thinly sliced
    • 1 clove of garlic, minced
    • 4 strips of bacon
    • Salt and pepper to taste
    In a large skillet over medium heat fry up your bacon.  When it's finished removed and put on a paper towel to absorb grease.  

    Turn the skillet down to medium low and add the garlic and onions and saute until the onions start to caramelize (and your kitchen smells completely delicious)

    Add the green beans and stir to combine everything.  You can use the beans straight out of the freezer, or you can let the beans thaw in the bag and drain the excess liquid.  I did an in between and there was some water in the pan, so if you have that problem, then just let it simmer until it's absorbed.

    Meanwhile, turn your broiler on to high.

    When the beans are almost finished, toss in the bacon (that you have no doubt crumbled while you were waiting for the onions to caramelize).  Then, wrapping the skillet handle in foil if it's not oven/broiler safe, stick under the broiler for 5-10 minutes or until the beans get crispy and slightly browned.

    Season with salt and pepper.

    Saturday, January 7, 2012

    Zucchini Fries


    Hello world!  I'm alive and well, just been using a lot of cookbooks/old recipes/food not worth mentioning which is why I haven't posted much lately.

    Today though, I have a new treat....Zucchini fries!

    My apologies in advance, I kind of threw this together and as usual, didn't measure, but this is something that you can alter based on how much you are making.  And a helpful step if you have the time is after you slice the zucchini, wrap it in paper towel and let it sit for a couple of hours to draw out some of the moisture (although who knows, maybe they will be crispier if you don't let them dry out??).

    Anyway, you will need:


    • Zucchini
    • Egg
    • Almond meal
    • Cayenne pepper (optional)
    • Garlic powder
    • Onion powder
    • Salt
    • Pepper
    Preheat oven to 400 degrees.

    Combine the almond meal and spices in one dish and whisk an egg in another.  Dip thinly sliced zucchini in the egg then dredge through the almond meal mix.  You want just a light coating on these, too much and we all know how almond meal tastes when its caked on (gross).  

    Arrange the zucchini strips on a lightly greased baking sheet and bake at 400 degrees for 20-30 minutes, flipping zucchini over halfway through.

    I baked mine for 10 minutes on each side, and I probably could have baked them just a little bit longer, but the coating was starting to get crisp, and I definitely tasted the flavor of the seasoning (if I had to guess, I'd say I used 1/2-3/4C of almond meal and maybe 1/2-1 teaspoon of garlic powder and onion powder and 1/4-1/2 of cayenne...I really need to get better about measuring).

    Serve with your side of dipping sauce (I whisked together a couple of tablespoons of olive oil mayo with a little bit of lemon juice, super tasty!).

    I had two small zucchini that I made up as a test and I ended up eating the entire dish, oops!